Initial Set Up
This is a series of blog posts which detail how I'm setting up my website with the t3 stack. If you haven't read the previous articles, I suggest looking at
- Part 1. : Redesigning My Website with the t3-stack
- Part 2 : Displaying Individual Articles
- Part 3 : Adding a table of contents to our blog articles
- Part 4 : Tidying Up the final product
You can see the completed website here
The goal of this specific blog post is simple, we want to write up a component which will parse our rendered markdown HTML and generate a automated table of contents for us.
Quick Mention : Most of the code here is adapted from Emma Goto's excellent article on adding content tables. I've modified and updated code to make it work for the t3 stack.
CSS Set-Up
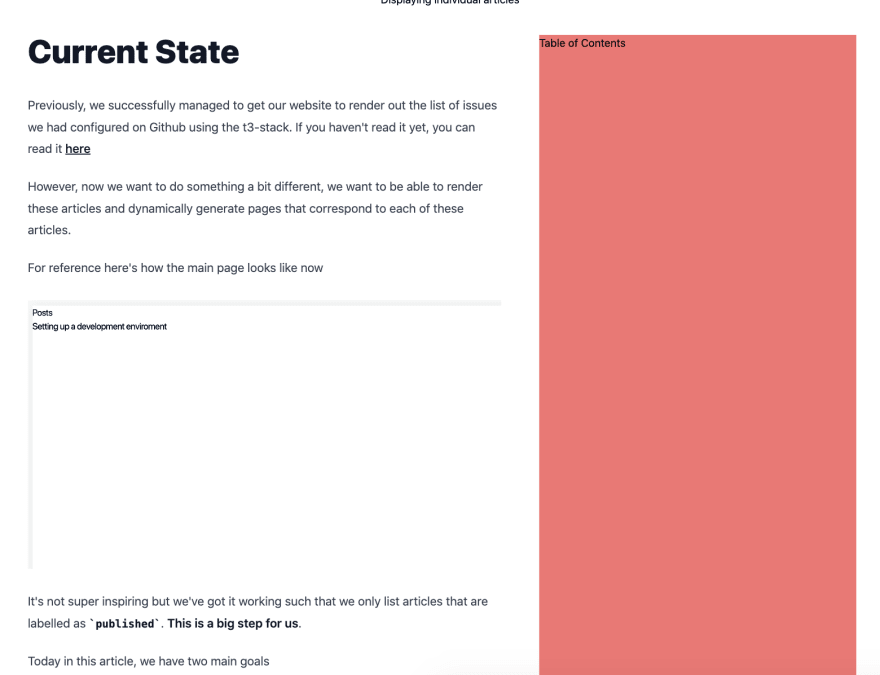
Let's first set up our CSS so that it works nicely. For reference this is my current [issueId].tsx file.
import { getPostByIssueId, getPostIds } from "../../utils/github"; import matter from "gray-matter"; import Link from "next/link"; import { renderToHTML, slugify } from "../../utils/string"; import { useEffect } from "react"; type BlogPostProps = { title: string; content: string; createdAt: string; }; type BlogPostParams = { params: { issueId: string }; }; export default function BlogPost({ title, content, createdAt }: BlogPostProps) { return ( <> <Link href={{ pathname: "/", }} > <p> ← Go Back Home</p> </Link> <div className="flex items-center justify-center flex-col "> <h1 className="mb-10">{title}</h1> <div className="xl:grid xl:grid-cols-7 xl:w-full xl:max-w-7xl"> <div id="content" className="max-w-sm md:max-w-lg lg:max-w-xl xl:max-w-4xl xl:col-span-4 prose xl:prose-lg px-4" dangerouslySetInnerHTML={{ __html: content, }} /> <div className="xl:col-span-3 mx-10 bg-red-400 sticky" style={{ top: "60px", maxHeight: "calc(100vh - 90px)", bottom: "30px", }} > <h1>Table of Contents</h1> </div> </div> </div> </> ); } export async function getStaticProps({ params }: BlogPostParams) { const { issueId } = params; const post = await getPostByIssueId(parseInt(issueId)); const { title, body, createdAt } = post; const { content: parsedBody } = matter(body); const content = await renderToHTML(parsedBody); return { props: { content: String(content), title, createdAt, rawContent: body, }, }; } export async function getStaticPaths() { const posts = await getPostIds(); const paths = posts.map((issueId) => `/blog/${issueId}`); return { paths, fallback: false, }; } This should give you a web page which looks somewhat like this
Now let's look at the list of things to do
- [ ] We need to dynamically set IDs for each H1 and H2 element which are equal to their content
- [ ] We need to then grab this list of IDs and convert it to a table of contents
- [ ] We then need to track the specific div where we are at and highlight the name of that div
- [ ] We need to allow users to be able to click to that specific div upon clicking it
Let's tackle them 1 by 1
Setting IDs for H1 and H2 elements which are slugs of their content
I first wrote up a small function to help convert my headings to slugs as seen below
export const slugify = (text: string) => { return text .toString() .toLowerCase() .replace(/s+/g, "-") // Replace spaces with - .replace(/[^w-]+/g, "") // Remove all non-word chars .replace(/--+/g, "-") // Replace multiple - with single - .replace(/^-+/, "") // Trim - from start of text .replace(/-+$/, ""); // Trim - from end of text }; I chose to store this in a small file I call string.ts
Most articles online tend to add the IDs dynamically when generating the web page or when parsing the data using remark. I couldn't really seem to get that to work so I used a quick document query selector in order to set these IDs
document .querySelector("#content") ?.querySelectorAll("h1,h2") .forEach((elem, id) => { //@ts-ignore const newId = slugify(elem.outerText); elem.setAttribute("id", newId); }); Note a few things here.
- There is a
//@ts-ignoresnippet in the codebase which tells typescript to ignore the possibility that each element might not have the outerText value. - We are selecting all
H1sandH2s which are present within a div with the id of content. This was set by me by modifying my react code as<div id="content" ... - We are seting the IDs by calling the
slugifyfunction on the text content of each of our H1s and H2s.
This can then be inserted into a useEffect hook as seen below
useEffect(() => { document .querySelector("#content") ?.querySelectorAll("h1,h2") .forEach((elem, id) => { //@ts-ignore const newId = slugify(elem.outerText); elem.setAttribute("id", newId); }); },[]) This ensures that we only run this code on the client side, and not the server side when it's being rendered.
Generating a list of headings
Now that we've successfully managed to set our IDs, we now need to generate a list of headings that we currently have for our article. This will allow us to ultimately generate out table of contents.
What we are aiming for however, is a nested table of contents, much like what you see below.

Where H1 elements have no nesting and H2 elements have some slight left padding . We can first write out a quick type for this nested and recursive data structure as
type PostHeaderLink = { text: string; id: string; children: PostHeaderLink[]; }; An example of this nested structure when applied to this article is seen below
[ { "id": "initial-set-up", "text": "Initial Set-up", "children": [] }, { "id": "github-issues-as-a-cms", "text": "Github Issues as a CMS", "children": [ { "id": "setting-up-a-personal-access-token", "text": "Setting up a personal access token", "children": [] }, { "id": "configuring-the-trpc-router", "text": "Configuring the TRPC router", "children": [] }, { "id": "getting-a-list-of-posts", "text": "Getting a list of posts", "children": [] }, { "id": "rendering-our-posts-on-the-frontend", "text": "Rendering our posts on the frontend", "children": [] } ] } We can generate this by simply applying a reduce to our list of headings since H2s will always follow the H1 they are under
const headingElements = Array.from( //@ts-ignore document.querySelector("#content")?.querySelectorAll("h1,h2") //@ts-ignore ).reduce((acc, heading) => { //@ts-ignore const { nodeName, innerText } = heading; switch (nodeName) { case "H1": return [ ...acc, { id: slugify(innerText), text: innerText, children: [] }, ]; case "H2": const newAcc = [...acc]; //@ts-ignore newAcc[newAcc.length - 1].children.push({ id: slugify(innerText), text: innerText, children: [], }); return newAcc; } }, []); Note : We use the
...spread operator in order to create a new copy of the acc to prevent potential memory errors
This in turn gives rise to the final hook as
import { useState, useEffect } from "react"; import { PostHeaderLink } from "../components/PostHeaderLink"; import { slugify } from "../utils/string"; const useHeadingsData = () => { const [nestedHeadings, setNestedHeadings] = useState<PostHeaderLink[]>([]); useEffect(() => { document .querySelector("#content") ?.querySelectorAll("h1,h2") .forEach((elem, id) => { //@ts-ignore const newId = slugify(elem.outerText); elem.setAttribute("id", newId); }); // A bit kooky stuff, just ts-ignore and move on const headingElements = Array.from( //@ts-ignore document.querySelector("#content")?.querySelectorAll("h1,h2") //@ts-ignore ).reduce((acc, heading) => { //@ts-ignore const { nodeName, innerText } = heading; switch (nodeName) { case "H1": return [ ...acc, { id: slugify(innerText), text: innerText, children: [] }, ]; case "H2": const newAcc = [...acc]; //@ts-ignore newAcc[newAcc.length - 1].children.push({ id: slugify(innerText), text: innerText, children: [], }); return newAcc; } }, []); //@ts-ignore setNestedHeadings(headingElements); }, []); return { nestedHeadings }; }; export default useHeadingsData; We can then write up a component which generates a table of contents recursively as seen below
import React from "react"; export type PostHeaderLink = { text: string; id: string; children: PostHeaderLink[]; }; type PostHeaderLinkProps = { links: PostHeaderLink[]; }; const PostHeaderLink = ({ links }: PostHeaderLinkProps) => { return ( <> {links && links.map(({ id, children, text }, index) => { return ( <li className="mt-5" key={id}> <a href={`#${id}`} onClick={(e) => { e.preventDefault(); //@ts-ignore document.querySelector(`#${id}`).scrollIntoView({ behavior: "smooth", }); }} > {text} </a> <ul className="pl-10"> {children.map((child, index) => { return ( <PostHeaderLink links={[child]} activeId={activeId} key={index} /> ); })} </ul> </li> ); })} </> ); }; export default PostHeaderLink; With this, we now have our table of contents generated! You should be able to get a webpage that looks something like this

I've taken Emma Goto's original code for a hook called
useIntersectionObserverwhich allows us to track the most recent
which you can read here.
The code is below
import { useRef, useEffect } from "react"; const useIntersectionObserver = (setActiveId) => { const headingElementsRef = useRef({}); useEffect(() => { const callback = (headings) => { headingElementsRef.current = headings.reduce((map, headingElement) => { map[headingElement.target.id] = headingElement; return map; }, headingElementsRef.current); const visibleHeadings = []; Object.keys(headingElementsRef.current).forEach((key) => { const headingElement = headingElementsRef.current[key]; if (headingElement.isIntersecting) visibleHeadings.push(headingElement); }); const getIndexFromId = (id) => headingElements.findIndex((heading) => heading.id === id); if (visibleHeadings.length === 1) { setActiveId(visibleHeadings[0].target.id); } else if (visibleHeadings.length > 1) { const sortedVisibleHeadings = visibleHeadings.sort( (a, b) => getIndexFromId(a.target.id) > getIndexFromId(b.target.id) ); setActiveId(sortedVisibleHeadings[0].target.id); } }; const observer = new IntersectionObserver(callback, { rootMargin: "0px 0px -40% 0px", }); const headingElements = Array.from( document.querySelector("#content").querySelectorAll("h1,h2") ); headingElements.forEach((element) => observer.observe(element)); return () => observer.disconnect(); }, [setActiveId]); }; export default useIntersectionObserver; In my case, because I render my content in a div with the id of content and only want to display H1 and H2 tags, I have modified one of the lines as seen below
This chunk of code simply selects a parent div with the id of
contentand then extracts out all the individualh1andh2tag content
const headingElements = Array.from( document.querySelector("#content").querySelectorAll("h1,h2") ); We can then import this in our main TableOfContents.tsx file and proceed to track the existing div we are at
import React, { useEffect, useState } from "react"; import useHeadingsData from "../hook/useHeadingData"; import useIntersectionObserver from "../hook/useIntersectionObserver"; import PostHeaderLink from "./PostHeaderLink"; const TableOfContents = () => { const { nestedHeadings } = useHeadingsData(); const [activeId, setActiveId] = useState(); useIntersectionObserver(setActiveId); return ( <div className="xl:col-span-3 mx-10 sticky " style={{ top: "60px", maxHeight: "calc(100vh - 90px)", bottom: "30px", }} > <div className="cursor-pointer text-xl py-10 px-4"> <ul> <PostHeaderLink links={nestedHeadings} activeId={activeId} /> </ul> </div> </div> ); }; export default TableOfContents; I have also extracted out the logic for nested headings into a general purpose hook I call useHeadingData
import { useState, useEffect } from "react"; import { PostHeaderLink } from "../components/PostHeaderLink"; import { slugify } from "../utils/string"; const useHeadingsData = () => { const [nestedHeadings, setNestedHeadings] = useState<PostHeaderLink[]>([]); useEffect(() => { document .querySelector("#content") ?.querySelectorAll("h1,h2") .forEach((elem, id) => { //@ts-ignore const newId = slugify(elem.outerText); elem.setAttribute("id", newId); }); // A bit kooky stuff, just ts-ignore and move on const headingElements = Array.from( //@ts-ignore document.querySelector("#content")?.querySelectorAll("h1,h2") //@ts-ignore ).reduce((acc, heading) => { //@ts-ignore const { nodeName, innerText } = heading; switch (nodeName) { case "H1": return [ ...acc, { id: slugify(innerText), text: innerText, children: [] }, ]; case "H2": const newAcc = [...acc]; //@ts-ignore newAcc[newAcc.length - 1].children.push({ id: slugify(innerText), text: innerText, children: [], }); return newAcc; } }, []); //@ts-ignore setNestedHeadings(headingElements); }, []); return { nestedHeadings }; }; export default useHeadingsData; Now all we need to do is to add a simple boolean into our code which will track whether the id of the div matches the currently selected div. If so, we change the text color
<a className={id === activeId ? "text-blue-600" : ""} href={`#${id}`} ... This then gives us the following webpage and look when we are done.

Now we just need to make sure this only appears in screens with a screen size that is larger than 1440px which can be easily done with the Tailwind CSS xl prefix. We also add some padding to our individual H1 and H2 tags by modifying the useHeadingData hook to add 30px of padding to the top.
document .querySelector("#content") ?.querySelectorAll("h1,h2") .forEach((elem, id) => { //@ts-ignore const newId = slugify(elem.outerText); elem.setAttribute("id", newId); //@ts-ignore elem.style.paddingTop = "30px"; }); And voila! We've successfully populated a table of contents for our articles which is able to track the existing div that we are looking at and dynamically populates based on the content of the page. In the next chapter, we'll look at modifying our function call so we can move on from our existing urls of <url>/blog/<issueId> to <url>/blog/<slug>.